Sunday 7 September 2014

Best practices for batteries in phones and computers

Got a smartphone or a tablet or a laptop? Are you reading this article on one? I'm willing to bet you haven't read the manual that came with it or have no idea how to get the best battery life out of your device. Well, lucky for you, you're in the right place because I've done the hard work for you. Well, I actually did it for myself, but thought it might be nice to share.

There are quite a few different types of batteries around that can be found in everyday consumer goods. To name a few in the range, Ni-MH (Nickel-Metal Hydride), Ni-CD (Nickel Cadmium), and Lithium Ion (Li-Ion). The most common found these days in laptops and phones (and tablets) is the Lithium-Ion variety. When you plug a flat Li-Ion battery in to charge, it goes through various stages of charging before it is completely full.
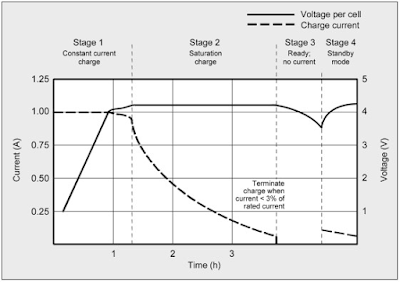
Image: Battery University
The first stage is the fast charge state. This is the stage where the device will gain the most amount of power in the shortest time. The battery is drawing as much power as it can from the wall, whilst of course maintaining safety restrictions put in by the manufacturer. Which brings me to:

Rule Number 1: Always use the official charger that the device came with.

There's a reason that they actually give you a charging pack/wall plug etc with your device. Yes, you can charge your phone or tablet through USB and yes you can also buy third-party chargers which appear to do the same job. However for the best lifespan out of your battery for your phone, you should always use the official charger that came in the packaging. The reason I can't emphasise this enough is on the plug, it will have certain specifications for how much current is being supplied to the battery. If it's not the official charger, either more or less current will be supplied to the battery and over time, prolonged use of unofficial chargers will affect the battery's capacity. This is especially apparent in chargers which claim to "fast charge".

The second stage is the trickle-charge state. Lithium batteries charge around 80-90% of their capacity in the fast charge mode, and the remainder is charged at a much slower rate. This is for a few reasons. One, it ensures that the battery is not overcharged, which could cause it to explode or burst into flame. This actually happened to someone who used an unofficial charger for her iPhone and it exploded whilst she was on a call to someone with the unofficial charger plugged in. This second stage is the best time to unplug your device from the wall and go. As Li-ion batteries don't actually need to be fully charged in order to operate at maximum performance, a partial charge is better.

The third stage is where batteries are finished charging and don't draw any more power from the wall as they are fully charged. This brings me to:

Rule Number 2: When charging your phone, laptop or tablet, turn it off.

This might be an annoying concept to deal with, and using the device whilst charging might seem like a good idea, but it actually reduces your battery's maximum capacity. According to the Battery University:
A portable device should be turned off while charging. This allows the battery to reach the threshold voltage unhindered and reflects the correct saturation current responsible to terminate the charge. A parasitic load confuses the charger.

Put simply, if the battery is not in use whilst charging it can reach the maximum capacity without the use of the device draining it at the same time. The battery can "get confused" and think it's full, but since you're using it, it is also draining power so it continues to charge as it hasn't quite reached full capacity. This in turn can reduce the overall maximum capacity of the battery as it would be continually charging, even though it's at near 100%. My suggestion would be that if you absolutely must use the phone or computer whilst it's plugged in, either use it whilst the battery is in the fast charge state and then unplug it, or just take the battery out (if you can).

Some further guidelines for battery charging from Battery University:
  • Charge at a moderate temperature (i.e. room temperature). Do not charge below freezing.
  • Chargers use different methods for “ready” indication. The light signal may not always indicate a full charge.
  • Discontinue using charger and/or battery if the battery gets excessively warm.
  • Before prolonged storage, apply some charge to bring the pack to about half charge.
  • Over-discharged batteries can be “boosted” to life again. Discard the battery pack if the voltage does not rise to a normal level within a minute while on boost.

Hope you found this helpful, and if you're interested in further reading:
If you liked this post, or found it useful, please feel free to share with your friends to pass the info on using the buttons below.

Friday 14 March 2014

Google Drive starts price war on online storage

According to their blog, today Google released cheaper pricing on their Drive product, Google's version of online cloud storage. What is Google Drive I hear you ask? Find out here.

Prices have dropped significantly, to the point where an extra 100gig of data, on top of your free 15gb will cost you less than $2 per month. This is very aggressively priced against the other online cloud storage providers such as Dropbox and OneDrive which I wrote about yesterday.

For so much storage at such a low price, it's a great option to have all your photos, music, videos, documents, files, stuff... whatever really saved in a secondary spot and available all the time in case anything happens and you lose your files. An 80% discount on a terabyte of data for less than $10 per month is a real bargain and an absolute must if you can't afford to lose any files.


If you liked this post, or found it useful, please feel free to share with your friends to pass the info on using the buttons below.

Thursday 13 March 2014

Setup OneDrive to automatically sync everything in the Documents folder

If you've got Windows, and you tend to use more than one computer or device like a tablet, then keeping your documents in sync is a great way to make sure you're always working on the latest file.

The new version of Microsoft Office 2013 has this functionality already built in, enabling users to create and save documents straight to and from OneDrive (formerly known as SkyDrive). But what about all those other documents you'd also like to access? Examples including files you've received from an email or documents you've downloaded from a website.

Usually many users will save these files to their documents folder. So now, you've got your Office files saved in your OneDrive and everything else is in a folder on one computer not accessible by other computers. Well that's about to change.

If you set your "Documents" folder location on your PC to be your OneDrive location, everything saved in this folder will be synchronised with the cloud. Here's how to do it.

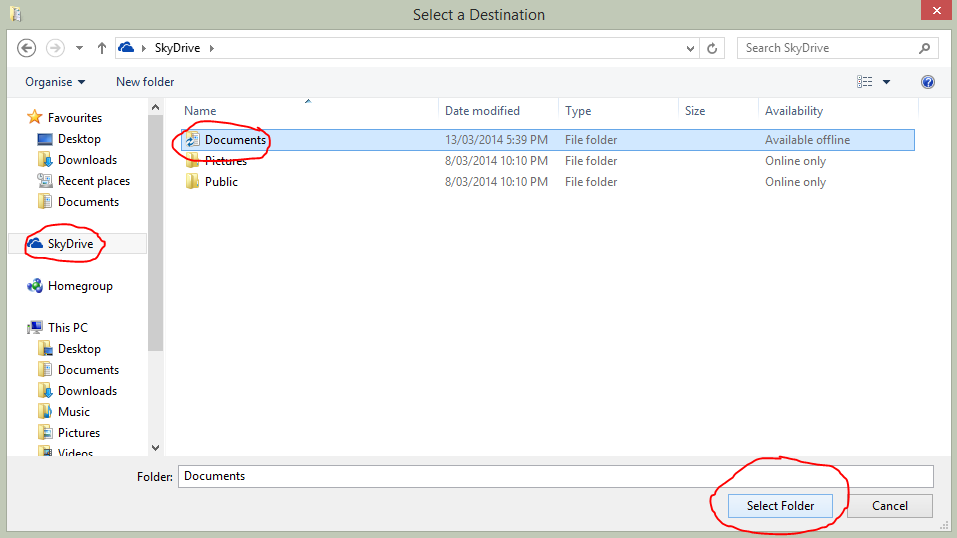
Assuming you have OneDrive installed on your PC already (or SkyDrive if it hasn't updated yet!), right click on the documents folder in the file explorer, and choose properties (as shown below, click to enlarge picture).
In the properties window, choose the location tab, then choose move. In the box that appears, double click OneDrive (or SkyDrive depending), and then select the documents folder inside (one click), and then choose "select folder" when it's highlighted.
Once done, hit ok. Now all the files in the "Documents" folder will be saved on OneDrive, so you never have to worry about losing your documents.
Now if you sign into OneDrive on your smartphone, tablet or another computer, all of your documents will be readily available.

Pro Tip: Microsoft gives you 7GB of free storage with OneDrive, which should be plenty for documents and related files, as text type files such as spreadsheets, presentations and text documents are relatively small in terms of file size. So it is important to make sure you only store documents in there and you should have enough space. Example, make sure music files (such as pesky iTunes library files) aren't saved in your "Documents" as this can take up lots of space quickly.

If you liked this post, or found it useful, please feel free to share with your friends to pass the info on using the buttons below. As always, any comments or questions can be left in the comments box below.

Tuesday 11 February 2014

Restore a deleted Mac partition table

Last Friday, I was attempting to install Windows on my partners iMac without a DVD/CD drive, and I had set up the drive in bootcamp, and committed the system to reboot. The Windows setup started, however when selecting the installation directory, Windows did not like the formatting that Bootcamp had setup, so it offered to delete the partition and recreate it's own NTFS partition - which I opted to do.

Still, Windows setup didn't like something about the disk - spitting out and error and not being able to proceed. A bit of (in hindsight amateurish) Google'ing and I found a solution to "clean the disk" which I accidentally interpreted as cleaning the partition. This was my downfall. What made the situation worse is that the TimeMachine backup which I thought was complete was in fact not complete, and hadn't been backing up for some time.

Crisis!

Having had a little experience with data recovery in the past, I straight away jumped on the data recovery search train and started my search for software which I could use to rebuild the partition table. The problem I found was that many sites and software packages were offering solutions based on disks which were either external drives or secondary to the operating system, which were useless to me, as the entire boot drive's partition table had been deleted.

Many hours of searching and looking at possible solutions included a number of data recovery programs which promised to recover partition tables or extract files from the hard disk but none prevailed. All I could do is boot from a USB stick or use the inbuilt Internet Recovery feature which comes with all Macs. This was dangerous as I didn't want to write to the hard disk, and I wanted maximise my recovery chances by avoiding any writing at all.

The hardest part was finding software which could look at HFS+ data recovery, or rebuilding partitions. Many programs promised the world, but even the trial versions did not deliver. In the end I found a completely free solution which I am happy to share with you now, so you can enjoy my happiness at being able to recover all that data by rebuilding the partition table.

In order to follow my guide, this only applies to Macs which don't have an optical drive.

You'll need:
  • Another computer to download install and use some software to help with this recovery.
  • A USB stick/thumb drive of at least 1gb in size (I used a 4gb stick)
  • A copy of an Ubuntu iso file (I used ubuntu-13.10-desktop-amd64+mac.iso - note the amd64+mac component of this file)
  • Download a copy of the freeware software "unetbootin"
  • A (relatively) fast internet connection with an ethernet connect to your modem - wifi won't work.
  • A USB keyboard and mouse - any should do. The bluetooth wireless mouse and keyboard that comes with most macs won't work throughout the whole process.
The guide:
  1. Once you've downloaded Ubuntu and unetbootin, insert your USB stick and burn a copy of Ubuntu to the USB stick so that you can boot from the USB stick (you can browse to the .iso file you downloaded which I would recommend instead of downloading on the fly).
  2. Plug the USB stick, keyboard and mouse into the damaged Mac and hold the option key when powering up. If you're using a non-mac keyboard, hold ALT on the left.
  3. Choose the USB icon to boot from and the unetbootin menu should appear, follow the menu to boot into Ubuntu which is the live version of ubuntu which you can use to test the OS, rather than install it.
  4. Within a few minutes you should be in the ubuntu desktop environment. Once there, go into the settings (cog icon on the left menu bar)
  5. Open software settings and enable all software from all repositories.
  6. Open a terminal window (click the ubuntu menu, then type terminal) and type "sudo apt-get update". This will update your software repositories which is necessary for the next step.
  7. Install a software program called TestDisk by typing: "sudo apt-get install testdisk". This will download and install testdisk on your system which we will use to interpret the damaged hard drive.
  8. Once complete, type sudo testdisk to open the program.
  9. The next few parts will be a bunch of questions asked by the software before it can begin scanning.
    • Decide if you want a log created (I didn't care)
    • Select the disk which relates to your Mac's Drive
    • Then it asks about the partition type - select Mac
    • The next choice should be analyse
    • And then quick search.
    • It will start scanning with items in green lines indicating partitions the software has found.
  10. After it has finished you should get some results showing the missing partitions!!
  11. At this screen, do not touch the keyboard yet. Grab the mouse and select the results and copy them. Then either write them down (not recommended as you could make a mistake which could cause SERIOUS problems later) or email them to yourself.
  12. My results looked like this: 
  13. You can now reboot your Mac.
  14. Once it restarts take out the Ubuntu USB stick and hold down command (or the windows key if a non-mac keyboard) and R
  15. This will start Internet recovery. Once at the Internet recovery menu, you can open a terminal window using the utilities menu.
  16. With the terminal window type ls (to LiSt the files of the directory you're in)
  17. Type "cd .." to navigate up one level in the folder structure.
  18. Type ls again
  19. Continue to do this until you reach the root directory, which will show "dev" when you do a ls command. Then type cd /dev/
  20. This will move you to the dev directory. At this point ensure your terminal window is as big as possible, use full screen if you can. Type ls again
  21. This will list all the devices on the mac. This is also where it becomes a bit difficult, so it's important to focus on what you are doing otherwise you could damage your disk even more.
  22. Type pdisk - this opens the pdisk program within terminal which allows you to make changes to your computers hard disk.
  23. Type L (note the capital) and hit enter - this will list the disks attached to your computer and should indicate which disk is required - this will be the disk we are looking for. For me, it was rdisk0 or rdisk1 (I can't remember which).
  24. Quit the program, by typing q, and then reopen the program by typing "pdisk /dev/rdisk0" (CAREFUL: your rdisk number could be different based on your result in step 23)
  25. Type c (lowercase). It should tell you that no partition map exists - which is correct - it doesn't yet, but we are about to recreate it.
  26. Type i (also lowercase). It will tell you some stuff about block sizes and the size of your hard disk in blocks.
  27. Type c again. Before anything else - get your info from step 12 above.
  28. In my example the first block was 409640 and the length was the "size in sectors" part, which for me was 1756533456. So type your first block part, hit enter then type your length. Then hit enter again and name it anything just don't use spaces - I just typed the word: one 
  29. Repeat this process for as many partitions that you had - I had 2. So I then typed c again to tell the program I had another partition to create, then 1756943096 and 1269536 and named it: two
  30. Then once you've typed in all your partitions, instead of typing c again, type w
  31. It might prompt you to confirm you want to write the changes, say that you do (y)
  32. Then type q to quit the program. Now restart your mac, holding down the option key.
  33. Your hard drive should appear. And you can boot back into OSX.
  34. First thing you should do now is setup a Time Machine Backup
I hope this has saved you from a sticky situation like it did for me. If you want to share the incredible moment I had yelling like Boris did in James Bond's Goldeneye feel free to buy me a drink:


If you liked this post, or found it useful, please feel free to share with your friends to pass the info on using the buttons below. Alternatively, if you're stuck, feel free to post your comments - chances are you are not the only one who got stuck at some point!