Got a smartphone or a tablet or a laptop? Are you reading this article on one? I'm willing to bet you haven't read the manual that came with it or have no idea how to get the best battery life out of your device. Well, lucky for you, you're in the right place because I've done the hard work for you. Well, I actually did it for myself, but thought it might be nice to share.
There are quite a few different types of batteries around that can be found in everyday consumer goods. To name a few in the range,
Ni-MH (Nickel-Metal Hydride),
Ni-CD (Nickel Cadmium), and
Lithium Ion (Li-Ion). The most common found these days in laptops and phones (and tablets) is the Lithium-Ion variety. When you plug a flat Li-Ion battery in to charge, it goes through various stages of charging before it is completely full.
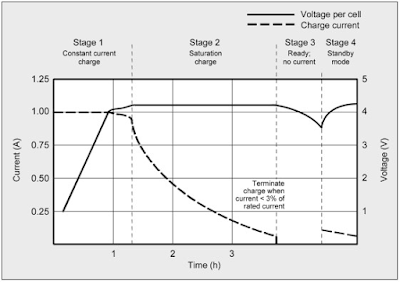 |
| Image: Battery University |
The first stage is the fast charge state. This is the stage where the device will gain the most amount of power in the shortest time. The battery is drawing as much power as it can from the wall, whilst of course maintaining safety restrictions put in by the manufacturer. Which brings me to:
Rule Number 1: Always use the official charger that the device came with.
There's a reason that they actually give you a charging pack/wall plug etc with your device. Yes, you can charge your phone or tablet through USB and yes you can also buy third-party chargers which appear to do the same job. However for the best lifespan out of your battery for your phone, you should always use the official charger that came in the packaging. The reason I can't emphasise this enough is on the plug, it will have certain specifications for how much
current is being supplied to the battery. If it's not the official charger, either more or less current will be supplied to the battery and over time, prolonged use of unofficial chargers will affect the battery's capacity. This is especially apparent in chargers which claim to "fast charge".
The second stage is the trickle-charge state. Lithium batteries charge around 80-90% of their capacity in the fast charge mode, and the remainder is charged at a much slower rate. This is for a few reasons. One, it ensures that the battery is not overcharged, which could cause it to explode or burst into flame. This
actually happened to someone who used an unofficial charger for her iPhone and it exploded whilst she was on a call to someone with the unofficial charger plugged in. This second stage is the best time to unplug your device from the wall and go. As Li-ion batteries don't actually need to be fully charged in order to operate at maximum performance, a partial charge is better.
The third stage is where batteries are finished charging and don't draw any more power from the wall as they are fully charged. This brings me to:
Rule Number 2: When charging your phone, laptop or tablet, turn it off.
This might be an annoying concept to deal with, and using the device whilst charging might seem like a good idea, but it actually reduces your battery's maximum capacity. According to the
Battery University:
A portable device should be turned off while charging. This allows the battery to reach the threshold voltage unhindered and reflects the correct saturation current responsible to terminate the charge. A parasitic load confuses the charger.
Put simply, if the battery is not in use whilst charging it can reach the maximum capacity without the use of the device draining it at the same time. The battery can "get confused" and think it's full, but since you're using it, it is also draining power so it continues to charge as it hasn't quite reached full capacity. This in turn can reduce the overall maximum capacity of the battery as it would be continually charging, even though it's at near 100%. My suggestion would be that if you absolutely must use the phone or computer whilst it's plugged in, either use it whilst the battery is in the fast charge state and then unplug it, or just take the battery out (if you can).
Some further guidelines for battery charging from Battery University:
- Charge at a moderate temperature (i.e. room temperature). Do not charge below freezing.
- Chargers use different methods for “ready” indication. The light signal may not always indicate a full charge.
- Discontinue using charger and/or battery if the battery gets excessively warm.
- Before prolonged storage, apply some charge to bring the pack to about half charge.
- Over-discharged batteries can be “boosted” to life again. Discard the battery pack if the voltage does not rise to a normal level within a minute while on boost.
Hope you found this helpful, and if you're interested in further reading:
If you liked this post, or found it useful, please feel free to share with your friends to pass the info on using the buttons below.